Thursday, September 29, 2011
{a thought for Thursday} Unexpected difficulties
Wednesday, September 28, 2011
Tuesday, September 27, 2011
{read: Swedish crime thriller} The Hypnotist by Lars Kepler
The story starts out with a gruesome massacre, and hypnotist Erik Maria Bark is called upon to hypnotize the gravely wounded son, the only witness, so that the police can try to identify and catch the killer before he find's the family's other remaining living member, the boy's sister. But what Erik finds out surprises Detective Joona Linna, who has a track record of always solving his crimes. As they begin to act upon what they learned, they discover there are unforeseen consequences of Erik's action. Ten years ago, he promised that he would never hypnotize anyone again after an incident involving one of his patients. In addition to this, he's also dealing with his own problems, including a prescription drug addiction and a marriage that's falling apart. Just like in real life, everything seems to fall apart at once for Erik.
The many layers of this complex story kept me turning the pages. Just as one plot thread seems to get resolved, another one develops and moves into the forefront. What you discover in the end isn't what you were looking for in the beginning. I'm looking forward to the next translations of Kepler's work.
The Hypnotist by Lars Kepler (Farrar, Straus, and Giroux, 2011)
My rating: 4 stars
Monday, September 26, 2011
{crafts} How to Read a Crochet Pattern
Now that we have created the basic crochet hat, I think it would be a good idea to look at all the basic crochet stitches. I am excited to try some new projects since the hat was so successful. Here is a wonderful, illustrated article on how to read crochet patterns publish at http://www.craftyarncouncil.com/tip_crochet.html by Jean Leinhauser.
How to Read a Crochet Pattern
by Jean Leinhauser
Once you’ve learned the basic crochet stitches, you’ll want to start your first pattern. (If you need assistance with learning basic crochet stitches, visit www.LearnToCrochet.com.) There are hundreds of beautiful designs available for you to make, but for a beginner, they may look scary because they are written in what looks almost like a foreign language.
That’s because crochet patterns are written using many abbreviations and terms, which save space and make patterns easier to read. So the first thing you need to do is become familiar with the abbreviations and terms.
Some of them are easy to understand, like these that represent basic stitches:
| Basic Stitch Abbreviations | |
|---|---|
| Ch | Chain |
| Sl st | slip stitch |
| Sc | single crochet |
| Hdc | half double crochet |
| Dc | double crochet |
| Tr (or trc) | triple (or treble) crochet |
Print these out and mount them on a card to keep handy while you work.
| Terms represent things you are to do, like these: | |
|---|---|
| Inc | increase (Add one or more stitches.) |
| Dec | decrease (Eliminate one or more stitches.) |
| Turn | Turn your work so you can work back for the next row. |
| Join | Join two stitches together; usually done by working a slip stitch in the top of the next stitch. |
| Rep | repeat (Do it again.) |
| A complete list of crochet abbreviations and terms and their meaning can be found at: www.YarnStandards.com. | |
Getting Started
With the abbreviations terms at hand, let’s look at a typical pattern. A pattern may be worked in rows (that is, back and forth to form a flat piece such as an afghan) or in rounds (worked around to form a tube with no seams, such as a hat).
Whatever way the pattern is to be worked, the very first thing you must do is make a slip knot on your hook. Does the pattern tell you this? No — it just assumes you know that!
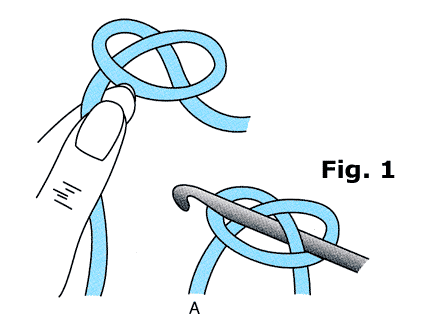
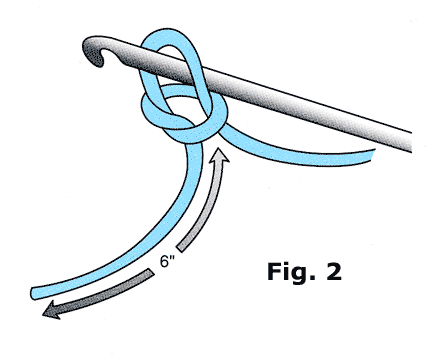
Here is how to make a slip knot (See Figure 1 & 2). So with the slip knot now on your hook, you will make a foundation chain of a specified length, which the pattern will state. The number of chains you need may be stated before the first row, or in the first row, depending on the pattern writer. Here are two examples:
Row 1: Ch 15; sc in 2nd ch from hook and in each ch across.
or
Ch 15.
Row 1: Sc in 2nd ch from hook and in each ch across.
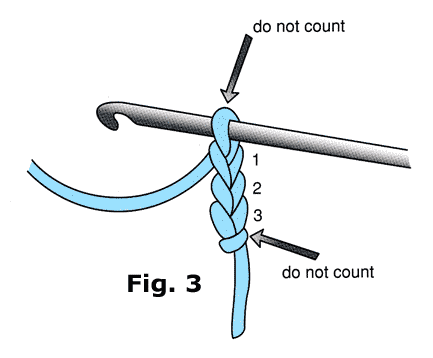
These both mean the same thing: Make a slip knot on your hook (remember that the patterns never tell you to do that), then make 15 chain stitches and be sure to make them loosely. Count these chains very carefully, and do not count the slip knot as a stitch. The loop on the hook is never counted as a stitch. (See Figure 3)
Now you have 15 chains and the pattern says to “sc in 2nd ch from hook and in each
ch across”. That means that you look at your chain, count the first chain away from the hook, which you will skip, then work a single crochet in the 2nd chain away from the hook.
Why do you need to skip the first chain? Well, try to work a single crochet in it and you’ll find out! Now work the single crochet in the 2nd ch from the hook, and in each of the remaining (abbreviated rem) 13 chains. You have now completed Row 1. Count your stitches carefully, but do not count the loop (abbreviated lp) on the hook, or the slip knot, which is now at the end of the row. You should have 14 single crochet stitches.
Hint: Count the stitches at the end of every row. Most patterns tell you how many stitches you should have, and there are several ways of doing this.
: 14 sc.
(14 sc).
—14 sc.
These are all ways to show the number of stitches you should have. Don’t confuse this with an instruction to do something.
Remember that first chain you skipped at the start of the row? When working in single crochet, you never work in that chain. It is gone forever!
Now you have worked Row 1. Look at your pattern: at the end of the row it may say ch 1, turn.” That means it is time to turn the work so you can make another row of stitches. You need to work the chain 1 to get your yarn high enough to begin the next row. Here is how to turn the work: (see Figure 4). We show turning the work to the right, but you can turn it to the left if you prefer. Just be sure to turn it the same way each time you turn.
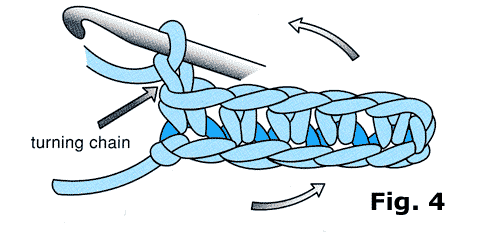
Hint: Always leave the hook in your work as you turn.
Now you are ready to start Row 2.
But some patterns don’t tell you to ch 1, turn, at the end of the row. They put that in the instructions for the next row,
So the pattern could be written in two different ways:
Row 1: Sc in 2nd ch from hook and in each rem ch; ch 1, turn.
Row 2: Sc in each sc across.
or
Row 1: Sc in 2nd ch from hook and in each rem ch.
Row 2: Ch 1, turn; sc in each sc across.
It really doesn’t matter whether you work the ch 1, turn, at the end of the first row, or at the beginning of the next row. Just do it the way the pattern tells you to.
When working Row 3 and all following rows in single crochet, never count the turning ch-1 as a stitch. It just disappears, like the skipped stitch when you worked the foundation chain.
Working in Double Crochet
Skipped chains and turning chains don’t disappear when working in double crochet or taller stitches. Now they count as a stitch.
Let’s do a first row in double crochet.
The pattern says: Ch 17.
Row 1: Dc in 4th ch from hook and in chain across: 15 dc.
So you will make a slip knot on the hook, then make 17 chain stitches.
Now count 4 chains away from the hook, and work a double crochet into that chain, skipping the first 3 chains. Then work a double crochet in each of the remaining 13 chains. You now have 15 double crochet stitches.
How can that be when you have only worked 14 double crochets? Remember those first 3 chains you skipped when you worked the first double crochet into the 4th chain from the hook? Those 3 skipped chains count as first double crochet of the row, and on following rows you will work into the top chain of those 3 chains just as though they were a regular dc stitch.
At the end of this row, or the beginning of the next, the pattern will tell you how many chain stitches you need to raise the yarn to the height of the stitches for the next row. For single crochet, that was one ch, and that chain did not count as a stitch.
But for double crochet, a taller stitch, you need to make 3 chains and then turn.And this time the 3 chains count as a stitch. So on the next row, you assume that the chain 3 counts as the first dc, and you will work into the next stitch, not the first stitch (See Figure 5 ).
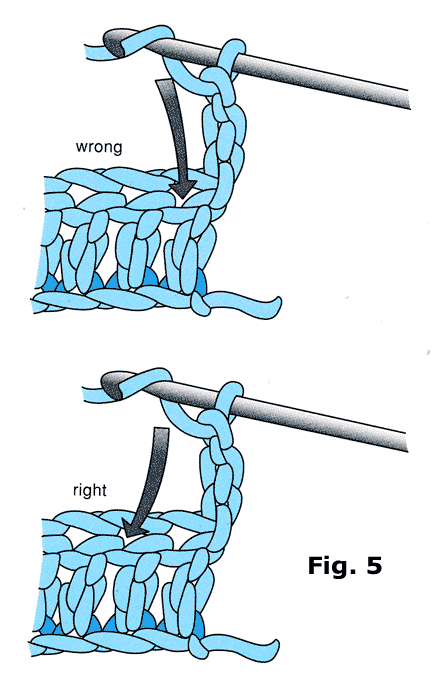
Unless your pattern tells you otherwise, on all stitches taller than a single crochet, the turning chain is counted as the first stitch of the row.
Parentheses, Asterisks, and Brackets
In addition to using lots of abbreviations and terms, crochet patterns use several symbols to tell you what to do. Crochet patterns often have a series of steps that are repeated several times across a row. Rather than writing these out time after time, asterisks (*) are used to indicate the repeats. A pattern might read like this:
Row 3: Dc in next 3 sts; *ch 1, skip next st, dc in next st; rep from * across row (or to end).
That means that the steps following the asterisk are to be repeated, in order, until you reach the end of the row.
Or the pattern might say:
Row 3: Dc in next 3 sts; *ch 1, skip next st, dc in next st*, rep from * to * across row (or repeat between *’s).
That is just another way of saying the same thing, and you work the steps given between the two asterisks, in order, across the row.
Now just to make things more complicated — sometimes you will repeat steps several times within a row, and then end up doing something else! That can mean you will find ** within the *.
Such a pattern might read:
Row 3: Dc in next 3 sts; *ch 1, skip next st, dc in next st,** work a
shell in next st; rep from * across row, ending last rep at **.
Don’t throw up your hands in horror! Take it one step at a time. First, ignore that ** until the pattern tells you to do something with it. So you will first work the steps following the asterisk across the row, and the last time you will end at the **, meaning you will not work the shell the last time.
Brackets [ ] also are used to tell you how many times to work a certain step. The number immediately following the brackets tells you how many times to do the step.
For example:
Row 7: Dc in next 4 dc, ch 1, [sk next dc, shell in next dc] 4 times, ch 1, dc in next 4 dc.
That means you will work the [sk next dc, shell in next dc] 4 times before going on to work the ch 1, dc in next 4 dc.
Parentheses are sometimes used in the same way.
Parentheses are used to indicate a group of stitches that are to be worked together into a stitch, such as: in next dc work (2 dc, ch 3, 2 dc). That means you will work all of those stitches in one dc, which makes a shell.
Working in Spaces
One instruction that often confuses beginners is “ work a shell in next ch sp”.
A chain space occurs when you work a chain stitch, then skip a stitch, then work into the next stitch. The space underneath the chain, where you skipped a stitch, is where you will work the shell. Spaces can be one or more chains, and if they are
3 or more, are often called loops (lps).
Working in the Round
Many crochet projects include working in rounds – such as a granny square.
Instructions may read: Ch 8, join with a slip stitch to form a ring.
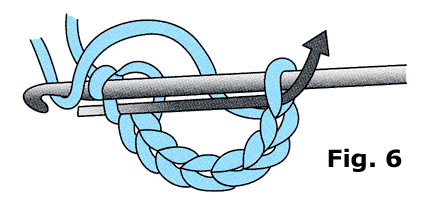
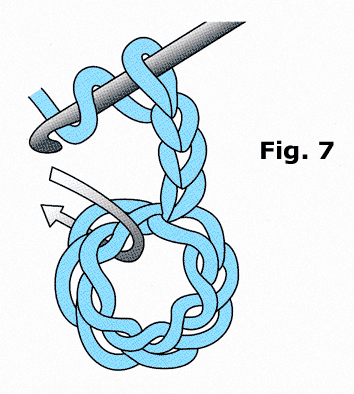
To do this, you will make a slip knot on the hook as usual, then make 8 chs, then insert the hook into the first chain made, hook the yarn and draw it through the first chain and through the loop on the hook (See Figure 6). Now you have a small circle or ring into which you will work stitches. To start, you will need to raise the yarn to the correct height with chains, just as you would to start a row. Figure 7 shows working a double crochet stitch into the ring. Your pattern will tell you what to work into the ring.
Front or Back Loop
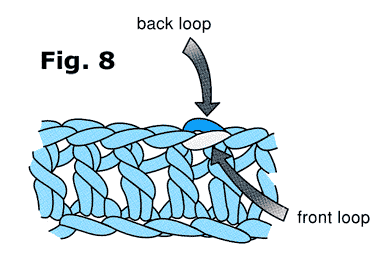
Most crochet stitches are worked under both loops of a stitch. Sometimes a pattern will tell you to work in the front loop only, or into the back loop only. The front loop is the loop closest to you, the back loop is the loop farthest away from you (See Figure 8).
Working Garments
If you are making a garment, you need to know some special terms.
Right front, right sleeve, right shoulder: These all refer to the actual body part on which the piece will be worn – the right arm, etc. The same applies to left front, left sleeve,left shoulder.
Right side, wrong side: You may be told to work with the right (or wrong) side of the piece facing you. The right side of a garment is the side that will be seen when it is worn.
Right-hand or Left-hand Corner: You may be asked to join yarn in a specific corner. This means the corner of the piece nearest your right (or your left) hand.
At the same time: This is used when you are asked to work two different steps (perhaps shaping at the armhole and at the neck) at the same time.
Work same as Left (or Right) piece, reversing shaping: This can be difficult for a beginner. Let’s say you have worked a series of decreases on a left shoulder. Instead of telling you exactly how to do this for the right shoulder, the pattern may just tell you to: Work same as left shoulder, reversing shaping. That means you have to figure out what to do! It will be easier if you take pen and paper and sketch out what you did the first time; then do this in reverse for the other piece.
Special Thanks
Thanks to Jean Leinhauser, one of the industry’s foremost designers/editors and best-selling author who has worked tirelessly to promote the craft of crochet, for preparing this helpful outline on “How to Read a Crochet Pattern.”
And special thanks to Leisure Arts for granting permission to reproduce the diagrams used in this article. The diagrams are taken from Learn to Crochet the Easy Way by Jean Leinhauser.
Thursday, September 22, 2011
{a thought for Thursday} Charm
Wednesday, September 21, 2011
Tuesday, September 20, 2011
{read: private investigator mystery} The Cut by George Pelecanos

Although some of my mystery book club members have raved about George Pelecanos, this is the first book of his that I've picked up. He introduces a new protagonist in this one: Spero Lucas is a 30-year-old Iraq vet returned to his native D.C. area. He's picked up work as an unlicensed private investigator and specializes in finding things and taking a 40 percent cut of whatever he finds. But when he starts to investigate the burglary of some Fed Ex-ed marijuana for an imprisoned drug dealer, he finds things are more complicated than they seem.
While one of the book's promo blurbs touted Pelecanos as one of the crime thriller writers who elevates the genre into literary fiction, similar to Dennis Lehane (whose books I love), it didn't quite reach that level for me, although it was definitely entertaining and held my attention. Lucas seemed to have elements of Robert B. Parker's Spenser and Michael Harvey's Michael Kelley in him. Curiously enough, he also reminded me somewhat of Seth Quinn in Nora Robert's Chesapeake Blue, the fourth book in her Chesapeake Bay Saga.
For those interested in the local music and restaurant scene in D.C., this would also serve as an excellent travel guide.
The Cut by George Pelecanos (Hachette Book Group, 2011)
My rating: 3 stars
Monday, September 19, 2011
Part 2: Owl Toddler Crochet Hat
Thursday, September 15, 2011
{a thought for Thursday} Truth
Wednesday, September 14, 2011
Tuesday, September 13, 2011
{read: Turkish whodunit} Hotel Bosphorus by Eshmahan Aykol, Ruth Whitehouse (translator)

This is the first in a series of novels featuring Kati, a German living in Istanbul. She owns the city's only mystery bookshop and when her acquaintance/friend/movie star comes to town to film a movie and the movie's director is murdered, Kati can't resist the chance to try to find out who did it. Now she can finally put into practice all the theoretical knowledge she's gained from reading mystery novels. Kati is also a woman who can’t resist a good man, and the ups and downs of her romantic escapades are woven throughout the mystery.
This is a translation into British English and it seemed a little awkward and stilted at times, although I enjoyed the tidbits about Turkish life and Istanbul that were woven into the story. The mystery itself was a bit predictable and the epilogue seemed a little heavy-handed. I think those details could have been worked into the final chapters of the book to make it a smoother read. That aside, this was an interesting peek into the culture of Istanbul. As a German Jew who has lived in Istanbul for 10 or 11 years, she brings a unique lens to that city’s culture, which she describes as being different than the Turkish culture in general.
Hotel Bosphorus by Eshmahan Aykol, Ruth Whitehouse (translator) (Bitter Lemon Press, 2011)
My rating: 3 stars


