Showing posts with label crafts. Show all posts

Monday, October 8, 2012

{crafts} Halloween Balloons


Pumpkin Balloons from MarthaStewart.com


From felt fiends to sinister silhouettes, these handmade touches are sure to give your home an extra-spooky feel this Halloween. A gaggle of helium-filled jack-o'-lantern balloons hovers near the refreshment table. The simple features are drawn onto the inflated balloons with permanent marker; choose an assortment of geometric shapes that are easy to create freehand.

Monday, September 17, 2012

{crafts} Googly Eye {Halloween} Frame


Googly Eye {Halloween} Frame


Here is a cute tutorial for a Halloween themed frame from A Diamond in the Stuff.


I just couldn't contain myself anymore....I am just SO in the mood for some "Fall" projects!!! I had this idea floating around in my head and just couldn't wait any longer to make it.


Wanna make a fun googly eyed Halloween frame too?

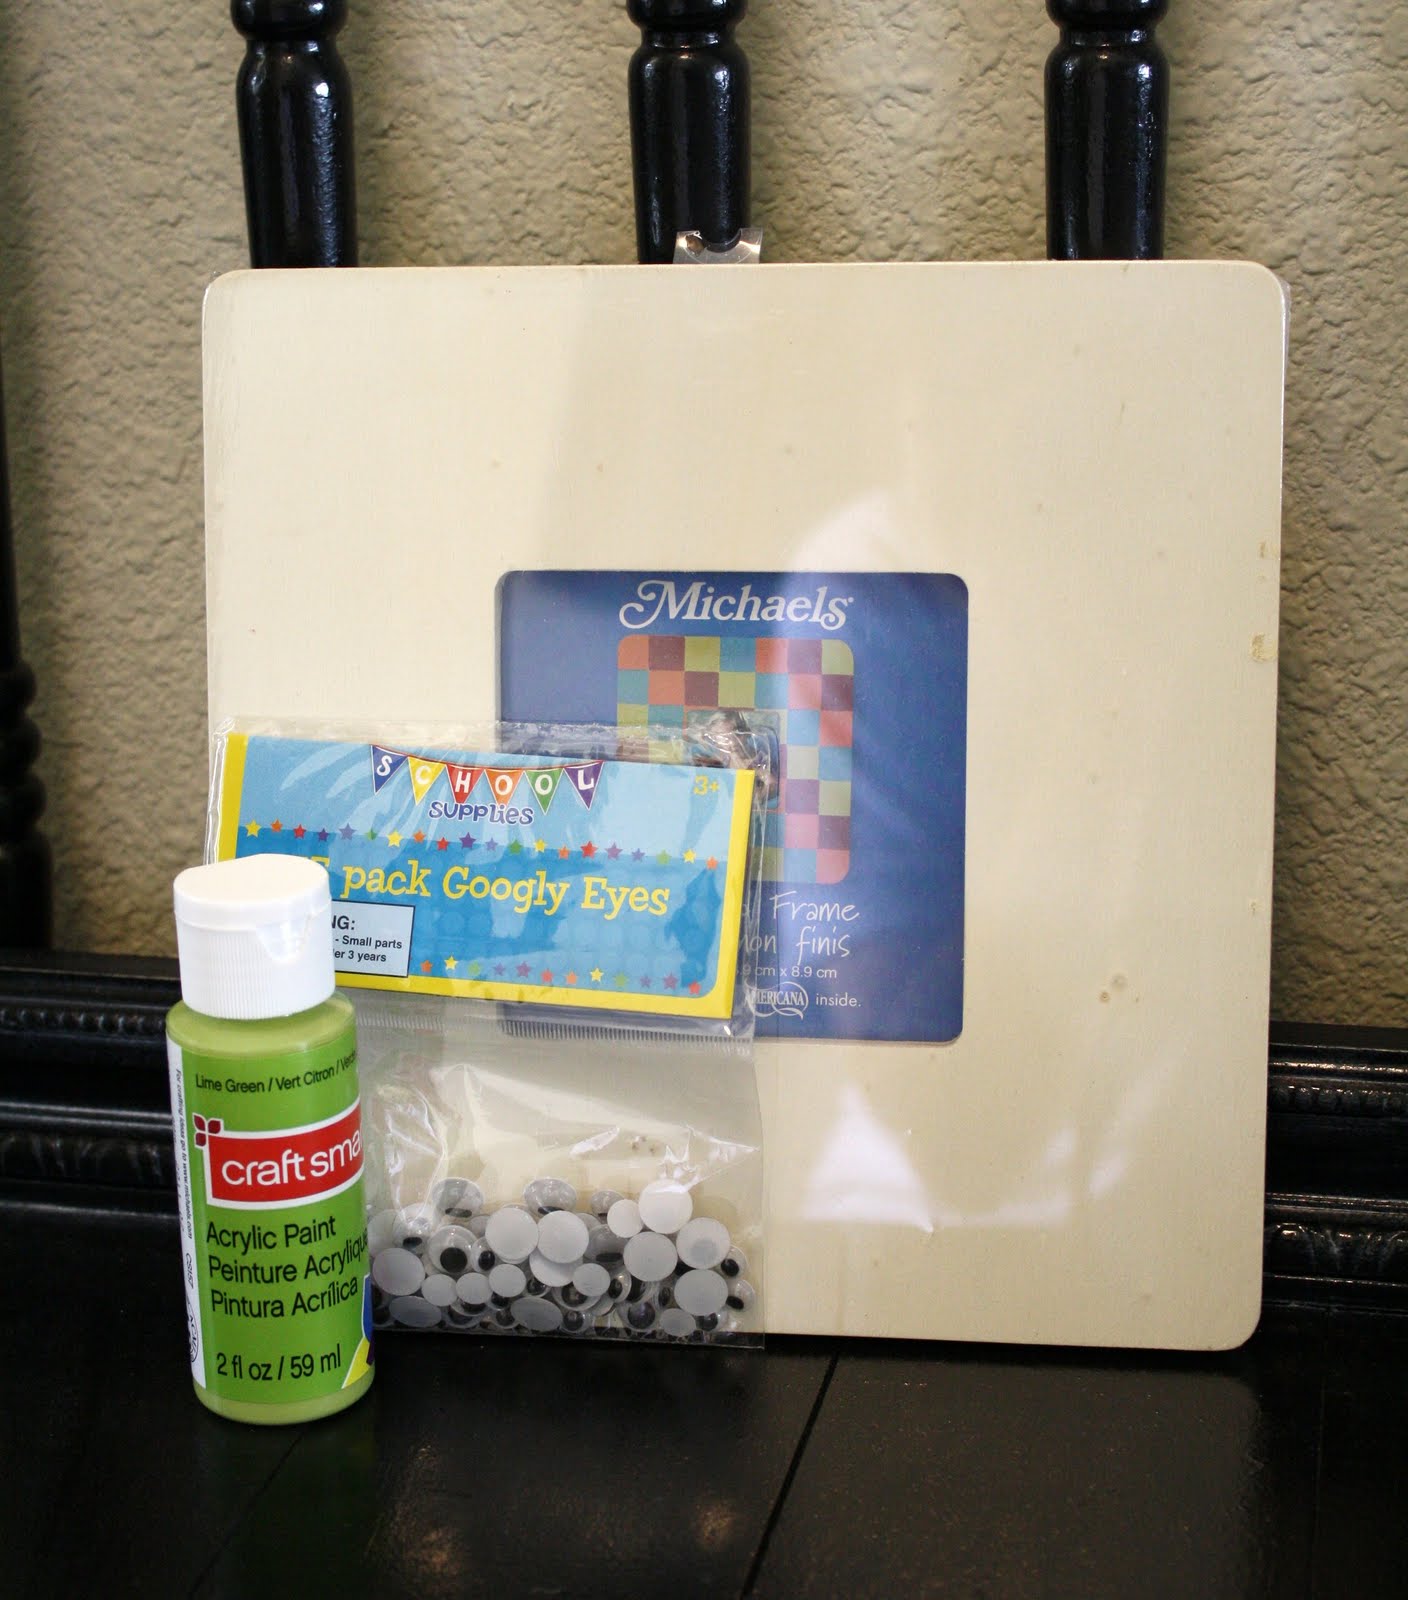
Gather your supplies:

-$1 Michael's picture frame
-Some lime green craft paint
-Lots and lots of googly eyes
-A couple embellishments (I used ribbon and chipboard letters)


I painted the picture frame with the craft paint and started gluing the google eyes on and glued some more eyes on.....and then glued even more on. This took quite awhile!


Once all the eyes were glued on...I took a breath...and then cut "EEK" out of some chipboard with my cricut. I painted the letters the same color as the frame. I decided to attach the letters to the frame with a sparkly black piece of ribbon. Of course I didn't have any glittery black ribbon so I just decoupaged some glitter onto some plain black ribbon.


Look at all that googly eye goodness!!!


Monday, August 20, 2012

{crafts} lanterns


I found this wonderful tutorial for diy lanterns. These look very cute leading up the stairs. They would be fun for the fall. Enjoy! Original tutorial is from The Forge.


diy: yarn wrapped painted jars


If you got here from Pinterest, Welcome :) This post has been quite popular and I'm glad you found it as well. If you like this tutorial please take a look at what else my blog has to offer. For more DIY posts simply click HERE

This was inspired by something I came across on the internet a while ago but never pinned and now I can't find it anymore. Go figure! 

I remembered that the original glass was white and had lines all over, so I figured I would just use some yarn and warp it around my jars and spray paint them to create the effect. 

Here is what you'll need:

- Several cleaned jars. I always keep mine for projects. Soak them in water to get the tags off and use some Goo Gone for the glue residue. Make sure to clean them with soap to get all the Goo Gone off or else the paint won't stick.
- Yarn or some sort of string. If the yarn has a lot of fuzzy fibers they may stick to the jar a little but it won't be very noticeable so don't worry about it too much
- A can of white spray paint. I used Flat. You can use any color you want but with winter coming up I though white was best suited. 
- You'll also need something to cover whatever surface you'll be spraying on. Spray paint doesn't work as well when it's cold outside so it will take longer to dry. Make sure to give it some extra time before you touch the jars. 


I used some regular packaging string and some yard with texture. Wrap the string around the jar tightly and tie a knot. Now wrap the string around the rest of the jar tightly criss-crossing and overlapping until you like what you see. Then just tie the end to the leftover string where you started and cut off the ends.


Place the jars onto your covered surface upside down and spray paint them evenly with 2-3 coats. Make sure to let them dry for 5-10 minutes in between coats. Once they are fully dried just cut the string in one place and unwrap. Now you can place a tea light inside and decorate away :) 

I think it would also look cute to wrap some twine around the bases of the jars for some more texture. 


I love the different effects the skinny string and the textured yarn create. The jars that were wrapped with the thicker yarn look like they have puffy clouds floating in the sky. 
This project is also super cheap since the jars were free and I had the string and yarn on hand, all it cost me was a can of spray paint. They would also make great little gifts, just tie a ribbon and bow around 3 and you're ready to go. 

Tuesday, June 19, 2012

{crafts} Reversible Purse from Martha Stewart

Everyone loves a new bag. Here is a tutorial from MarthaStewart.com for a simple reversible bag, which could be a fun summer day project.


This simple reversible purse is a wonderful project for beginning and advanced sewers alike.
Tools and MaterialsBag template
Heavy paper or cardstock
1/2 yard of patterned fabric
1/2 yard of solid fabric
Pencil
Fabric scissors
Pins
Sewing machine
Coordinating machine-sewing thread
Iron
Needle and thread for basting stitch
Reversible Purse How-To1. Download, enlarge, and print template on heavy paper or card stock. Trace template twice on each fabric and cut out.

2. Align and pin the two solid pieces together, right sides facing. Do the same with the two patterned pieces.

3. Using 1/4-inch seam allowance, sew along the top of each handle and along the bottom curve of each pinned piece, leaving both sides of both handles open.

4. Turn the solid piece right side out, and insert the solid piece into the inside-out patterned piece. Line up seams, raw edges, and handles.

5. Pin the edges of the "neckline" of the bag and sew with a 1/4-inch seam.

6. Going through the longer handle, turn the entire bag right side out (patterned fabric on the outside). Press all seams.

7. Fold raw edges of "armholes" in 1/4 inch and press. Baste together. Topstitch 1/8 inch around bag handles to finish.

Monday, May 14, 2012

{crafts} Memorial Day Rockets


Rocket Favor How-To:

  1. Print the Rocket Crackers Clip Art onto heavyweight paper; cut out the shapes.
  2. Place the rectangular clip art blank side up. affix double-sided tape to 1 long edge. Fold a piece of tissue paper in half (so it measures 4 by 5 1/2 inches). Place the tissue fold at the bottom of the card stock, pressing it to the tape to secure.
  3. Roll the card stock and tissue into a tube, and secure with double-sided tape. Cinch the tissue at the bottom of the rocket, and tie it with twine.
  4. Roll fan-shaped clip art into a cone; secure with hot glue. Place candies inside rocket. Use hot glue to attach cone to body.

Monday, May 7, 2012

{crafts} Mother's Day Printable Card


Free printable Mother's Day card From How About Orange

Need a simple Mother's Day card you can print immediately? Download my watercolor freebie right here. The finished card is 5.5" x 4.25", sized for a standard A-2 announcement envelope. Be sure to print at 100% without a shrink-to-fit option checked.

Monday, April 16, 2012

{crafts} Memorial Day Decorations

Time to start thinking about summer! Here is a great craft idea from Martha Stewart. The firework decorations would look great hanging outside on the porch. They would add a little fun to a holiday barbecue.


Introduction

Fabric star medallions will brighten up your party like daytime fireworks. 
Use standard cotton prints for this project -- nothing too heavy or light. Spray starch helps the creases keep their shape.


Step 1

Cut a length of fabric: The width will be the diameter of the medallion; the length should be 1.6 times the width (for example, for a 15 1/2-inch medallion, cut about 25 inches of fabric).
Step 2

Fold fabric accordion-style in 1 1/2-inch sections (A). After each fold, spray with starch, and iron. Continue up length of fabric. Make sure your first and last folds are in the same direction.

Step 3

Stitch along the middle of the folded rectangle to create a pivot point (F).
Step 4

Trim both ends of the pleated rectangle at a 45-degree angle, so the angles slope toward the raw edge of the fabric (F) -- these cuts create the medallion's starlike points (G).
Step 5

Connect sides of the rectangle by fanning out fabric from center stitch and adhering with fusible webbing; iron. Sandwich a piece of ribbon (it should be long enough to hang the medallion) between the fusible webbing and the fabric. Connect remaining sides with fusible webbing, or tape for easy disassembly and storage. Stitch monofilament through the fused edge in the back, and hang.


Read more at Marthastewart.com: Star Medallion - Martha Stewart Crafts 


Monday, March 19, 2012

{crafts} Orange Stud Bracelet


I love these bracelets, and if I can find the beads I will definitely be making some. I originally saw them on pinterest, and the tutorial can be found here: http://www.makeitandfakeit.com/search?updated-max=2012-02-13T17:22:00%252B01:00&max-results=20

DIY Orange Stud Bracelet


Loving this bracelet by the way, but I guess you got that since I only share my very favorite pieces with all your amazing selves! 

Monday, March 12, 2012

{crafts} Musical fun


My son loves music and loves to play with all of his instruments. Here is a great tutorial showing how to make a simple homemade instrument. The original tutorial can be found at http://www.minieco.co.uk/tubular-cardboard-bells/


Tubular (cardboard) bells!

This is really easy. Get a sturdy cardboard tube. Pierce holes at regular intervals round the outside. Using a needle and thread attach bells to tube. Hey presto…a cheap and very cool little instrument.
I got my cardboard tube from inside a roll of binbags. I reckon you could do this with a toilet roll tube but it may not last as long. Wrapping paper tubes would also work pretty well.
If you are handy with a pair of knitting needles then make some knitted ankle cuffs too!
I used a fairly thick thread to attach the bells to the tube. Please bear in mind they do come off from time to time so take care around little ones.
Keep your eyes peeled because I am doing a guest post over at ohmyhandmade.com in the next week which is very exciting.
I also want to do a big shout out for Michelle at michelemademe.blogspot.com. Michelle used mycrocodile design to make some edible art – check it out!

Monday, March 5, 2012

{crafts} Paper Gems


Here is a fantastic tutorial for paper gems. How fun would it be to make these for display in a pirate's treasure chest! With minimal supplies (paper + glue) you can create beautiful jewels. If you have a little helper, glitter might be a fun addition. 

Paper gems (+ templates)

This has got to be one of my favorite projects to date…which is a good job because I nearly broke my brain putting the templates together!! I’m not so good at maths and figuring out angles (my lovely Mum is a retired maths teacher so I should know better!). By the way this project is quite fiddly so more aimed at grown-ups or older kids.
Paper gems
My paper gems were very influenced by these wonderful crayons (via Deborah’s Pinterest board).
Paper gems
You can use these paper gems as hanging decorations (for your Christmas tree) or you can incorporate them into a mobile or garland. I would love to make about a hundred and string them up in front of my window…however there is a limit to my patience!!
Paper gems
If you spray them lightly on one side they look very pretty and a bit more crystal-like! (Not very eco-friendly but I found it hard to resist). Skip below the jump for pdf templates and instructions.
Paper gems
If you love crystals and gems as much as I do then check out these cool projects:
Edited to add: Check out this great advent calendar idea using my paper gems. Thanks Marta!
Kids craft coming up next week…I absolutely promise this time!
Off topic:
Huge thanks to Kathreen from whipup.net for choosing one of my images for her 2012 calendar. Be sure to check it out!
I’ve been a total slacker on email lately…but intend to catch up over the next week. So if you have emailed, sorry, you will hear from me soon!

How-to

You will need:
♥ Paper
♥ Scissors
♥ Cutting board (optional)
♥ Glue stick
♥ Silver/gold spray (optional)
1. Download the minieco-paper-gems.pdf
2. Print template onto a sheet of coloured A4 paper
3. Cut out the templates. (Cut along solid lines. Score and fold the dashed lines).
4. Stick together using a gluestick. (There is probably a better kind of glue to use…I would love to hear recommendations from any paper-crafters out there!)
5. If you want to spray the gems, lie them on an old piece of newspaper and lightly spray the top-side of the gems. (I think they look better sprayed on one side only).
!!If you want to hang your gems then thread a piece of cotton through before sticking the pieces together!!
Due to it’s fiddly nature, this project is not really suitable for kids.
Any problems then leave a comment!
Paper gems

Monday, February 27, 2012

{crafts} Natural Bean Jewelry


I love these necklaces. They would be so much fun to make. I think the hardest part would be drilling the holes. Once the holes were drilled it would be fun for a child to help string the beans! This tutorial is part of Etsy's How-Tuesday and can be found at: http://www.etsy.com/blog/en/2012/how-tuesday-natural-bean-jewelry/

Natural Bean Jewelry


“Me, sexy? I’m just plain ol’ beans and rice.”  — Pam Grier
Once thought of as the seat of the soul, beans have been buried with the dead, deemed the seed of sin, grown for almost nine millennia, and eaten daily across the globe. With over 4,000 cultivar they come in coats of many colors: rich red and purple kidney, tawny intricate tans of cranberry, or the the simple stark contrast of the black eye. I’m Lisa Kraushaar of radicals— by day a mild-mannered Etsy Admin — here to show you how to make beans into beads, and focus on the legume’s more decorative values.
Supplies You’ll Need:
  • Approximately 300 dry beans, any type (Pictured above are calypso beans, black eyed peas, red beans, and cranberry beans.)
  • Waxed thread
  • Flex shaft or dremel hand tool (or any tool that drills)
  • 1mm drill bit
  • Bench pin (or another wooden surface to drill into)
  • 4 mm spherical burr
  • Super glue
  • Scissors
Directions:
1. With your bench pin at the ready, firmly secure your 4mm burr in your flex shaft or dremel. Carve a nook the size of the beans you’ve decided to use in you bench pin. This will serve as a brace to hold your bean secure when you apply the pressure of your drill.
Beans with drilled holes. Expect some bean dust!
2. Replace the burr with your 1mm drill bit in your flex shaft. Pinch the bean firmly parallel to the direction you’ll drill your hole. Hold it securely in the nook you’ve carved in your bench pin. Place your drill at the desired entrance of your hole and apply firm pressure against your drill bit and bean. At a gentle speed, push your drill through the length of the bean.
Hold your flex shaft firmly, but without a stiff wrist. In the event that your drill skips away from the bean, a loose wrist will give you the flexibility to pull away before nicking your fingers. You can brace your drill wrist against your bench pin for greater control.
Repeat step 2 until you’ve drilled holes through all of your beans.
3. Unspool about 2 1/2 yards of waxed thread. String your beans until you have about 6 ft. of beaded cord. The wax thread will be stiff enough to string your beads without a needle. If the tip of your string becomes frayed, twist or snip it back into a point. If you have any problems stringing your bean, blow air through the hole of the bean or clear it out with a needle.
4. Firmly tie both ends of your beaded string twice. Apply a small amount of super glue to your knot. Make sure to coat the spaces where stings some together. Let it dry overnight.
5. Snip the remaining string tight to your knot. Since you’ve glued the knot, you need not fear it will untie. You now have a beautiful string of beans that can be draped several times around the neck or wrapped around your wrist for a striking bracelet.
6. Wait for the oohs and ahhs to begin!